
Developing hypervisor from scratch: Part 1 - Intro and Setup
In this article series you are going to learn how to develop your own hypervisor for virtualization in linux ecosystem. Also this series will help to learn low level virtualization.

Full virtualization in our system is provided by hypervisors. These hypervisors uses intel/amd cpu features for isolation and general virtualization related tasks. Understanding internal of virtualization can be possible by learning to develop own minimal hypervisor. In this article series I am going to walk you through the step by step guide to create own hypervisor in linux.
Motivation
There are only few but good resources on internet that teach you to create own hypervisor, but till day all of them are implemented in windows ecosystem. So for linux developers, I have decided to implement this whole process of developing hypervisor. Implementing all these in linux was little frustrating because of lacks of resources available but at the same time having availability of linux kernel source code helps me at different stages. Not to forget that if you want to try creating hypervisor using Intel developer manual then you will find it really annoying and very complex to follow. In these cases article series like this will really help you to understand things and follow as reference. Leaving all aside lets start our journey to develop own hypervisor.
Setup and Prerequisites
My development environment consist of Linux based x64 system running on Intel processor.More info is below.

As a prerequisite, you should have good knowledge of C programming(seasonal development will also work) and Assembly language(Intel x86/x64). To follow with me it is also recommend to have hands on developing linux kernel module and using inline assembly. Although I will give overview of developing linux kernel module in next section but to learn about inline assembly, you can refer here.
Disclaimer: I am just a seasonal kernel developer and not an expert in developing kernel modules. So you may find lots of bugs in my code. It can make you frustrated but remember to comment the issue so it will help others and also me to fix it in the article.
Developing Kernel module
A minimal code of linux kernel module looks like this
#include <linux/init.h>
#include <linux/module.h>

static int my_init(void)
{
    printk(KERN_INFO "Hello world.\n");
    return  0;
}

static void my_exit(void)
{
    printk(KERN_INFO "Goodbye world.\n");

    return;
}

module_init(my_init);
module_exit(my_exit);
module_init will run my_init while loading the module in runtime kernel and module_exit will run my_exit while unloading the module in linux kernel.
To compile the program you need to create a simple makefile which looks like this:
ifeq ($(KERNELRELEASE),)
		KERNELDIR ?= /lib/modules/$(shell uname -r)/build
		PWD := $(shell pwd)

modules:
		$(MAKE) -C $(KERNELDIR) M=$(PWD) modules EXTRA_CFLAGS="-g -DDEBUG"
modules_install:
		$(MAKE) -C $(KERNELDIR) M=$(PWD) modules_install

clean:
		rm -rf *.o *~ core .depend .*.cmd *.ko *.mod.c .tmp_versions

.PHONY: modules modules_install clean

else
        # called from kernel build system: just declare what our modules are
		obj-m := hypervisor.o
endif
Here we are assuming the name of your module's C file is hypervisor.c. You need to name this file Makefile and run it using make command.
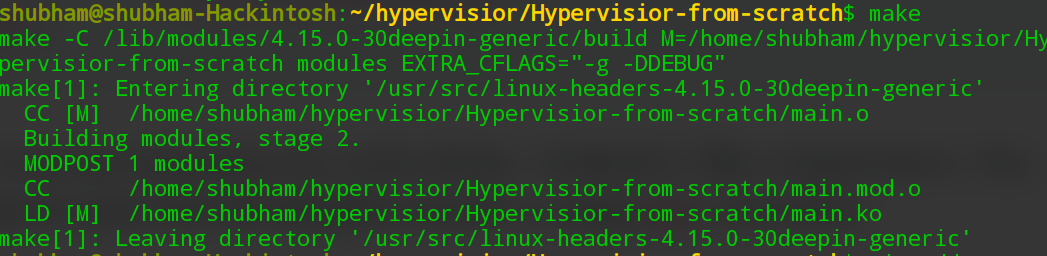
This will create a hypervisor.ko file which you can load in the kernel by sudo insmod hypervisor.ko and unload using sudo rmmod hypervisor. To get the message printed by the module, you can use following command dmesg |tail.
Intel Virtualization internals
Common terminologies
Let's first get familiar with few common terminologies used in hypervisor.
Virtual Machine Extensions (VMX) - Is intel cpu flag used to define support of virtualization/VMs in processor.
Virtual Machine Monitor (VMM) - A VMM acts as a host and has full control of the processor(s) and other platform hardware as well as the guest initialization. A VMM presents guest software (see next paragraph) with an abstraction of a virtual processor and allows it to execute directly on a logical processor. source: Intel manual
VMX Root/ VMX Non–root operation - In general, a VMM will run in VMX. root operation and guest software will run in VMX non-root operation. Transitions between VMX root operation and. VMX non-root operation are called VMX transitions.
VIRTUAL-MACHINE CONTROL STRUCTURE (VMCS) - VMX non-root operation and VMX transitions are controlled by a data structure called a virtual-machine control structure (VMCS). Access to the VMCS is managed through a component of processor state called the VMCS pointer (one per logical
processor).
Common Instructions
VMXON - Enable VMX
VMXOFF - Disable VMX
VMLAUNCH - Start/enter VM
VMRESUME - Re-enter VM
VMCLEAR - Null out/reinitialize VMCS
VMPTRLD - Load the current VMCS
VMPTRST - Store the current VMCS
VMREAD - Read values from VMCS
VMWRITE - Write values to VMCS
VMCALL - Exit virtual machine to VMM
VMFUNC - Invoke a VM function in VMM without exiting guest operation
The flow of vmx operation can be explained in below image.
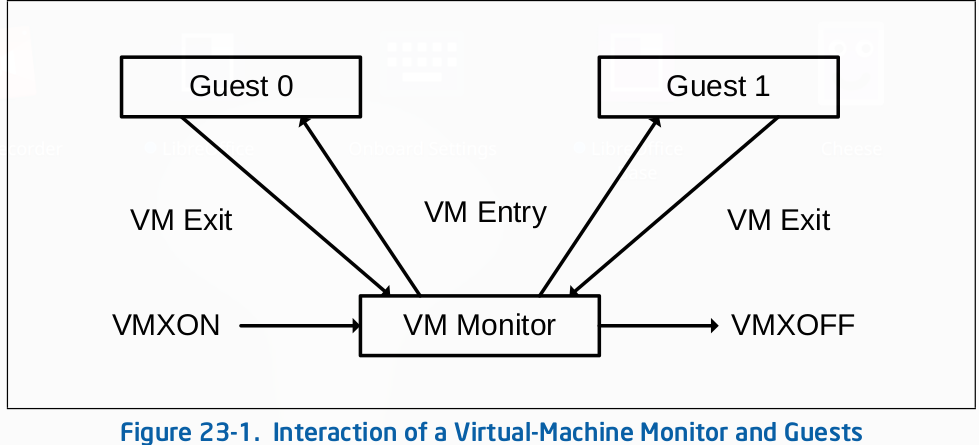
- Software enters VMX operation by executing a VMXON instruction.
- Using VM entries, a VMM can then enter guests into virtual machines (one at a time). The VMM effects a VM entry using instructions VMLAUNCH and VMRESUME; it regains control using VM exits.
- VM exits transfer control to an entry point specified by the VMM. The VMM can take action appropriate to the cause of the VM exit and can then return to the virtual machine using a VM entry.
- Eventually, the VMM may decide to shut itself down and leave VMX operation. It does so by executing the VMXOFF instruction.
In general VMM will takes these actions:
- Initially enter VMX mode using VMXON
- Clear guest’s VMCS using VMCLEAR
– Load guest pointer using VMPTRLD
– Write VMCS parameters using VMWRITE
– Launch guest using VMLAUNCH
– Guest exit (VMCALL or instruction, ...)
– Read guest-exit info using VMREAD
– Maybe reenter guest using VMRESUME
– Eventually leave VMX mode using VMXOFF
You may require to use Intel's developer guide for reference purpose in parallel to this series. It have everything mentioned related to virtualization in Intel processors but in not so reader friendly way.
In next part we will start our coding journey.
Click here for Part 2.